


Cherry Blossom Craft
- Samantha

- Mar 29, 2022
- 1 min read
Guest Blog by Blair Wilson @these_reveries
Spring is here and we’re all so glad to welcome it! One of our favourite crafts for a variety of themes is using tissue paper to create bloom features. Here’s how we created a Cherry Blossom tree using tissue paper.


To make your Cherry Blossom Trees you’ll need:
Heavy paper like card stock or construction paper
A pencil
Glue
Small container
Tissue Paper
Step One:
Draw or print a bare tree. ( You can draw your own or download the tree template pdf below)
Cut tissue paper squares
Step Two - Four:
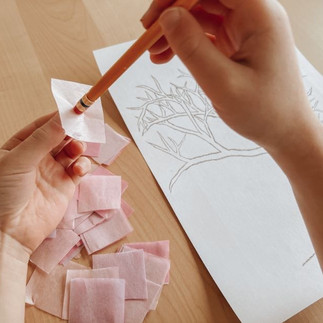
2. Place the eraser side of your pencil in the middle of a tissue paper square & wrap the square around the eraser of your pencil.
3. Gently dip the end of the pencil into some white glue
4. Press the tissue paper gently onto the paper


5. Continue creating blossoms to fill your tree!

Note:
Eventually, the eraser may start to get sticky from glue passing through the tissue paper. Simply run under water and wipe with a towel.
Download your free tree template below!
If you enjoyed this craft be sure to visit Blair on Instagram @these_reveries for more fun nature activities!


What book is this